MW4 DMZ / FIELD NOTES
MW4 DMZ loot route: three buildings at Chang-san Air Base, pinned on the Hajin map
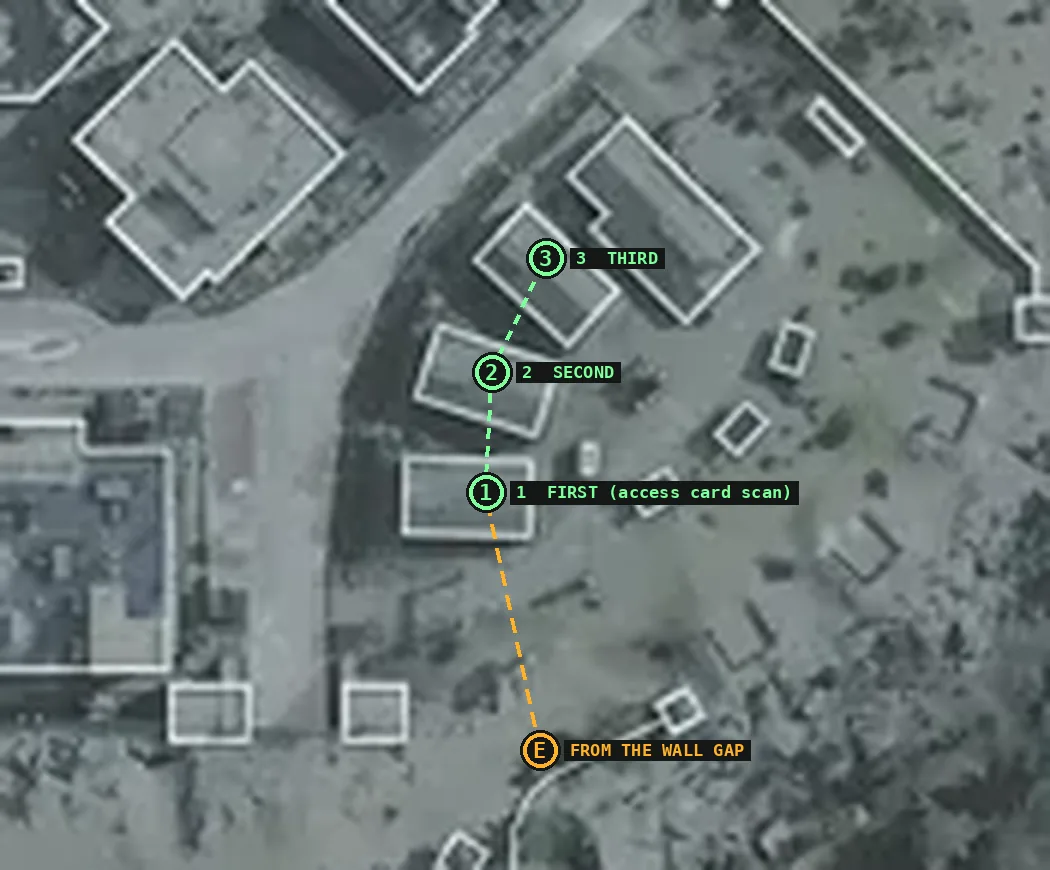
B-Man posted a DMZ loot run this morning that takes under ten minutes, needs nothing but a free loadout and only touches three buildings. His video is above. He points at the buildings on his in-game map; we took those pings and pinned them on our own Hajin map, so you can see exactly where you drop, where you go in and which three blocks to clear. Then we went through his run frame by frame to see what it actually paid out.
Quick card
- Route
- Operation Iron Citadel spawn, east wall gap at Chang-san Air Base, three loot blocks, exfil on the river
- Kit
- free loadout, knife out for speed
- Time
- about 6.5 minutes on the Radiation Countdown, drop to exfil, in his run
- Paid out on camera
- two 3D Printer Recipes (Screamer Mine, 2-Plate Helmet Armor Vest), Rigid Synthetics, resources
- Threat
- Critical inside the base
The route in one line
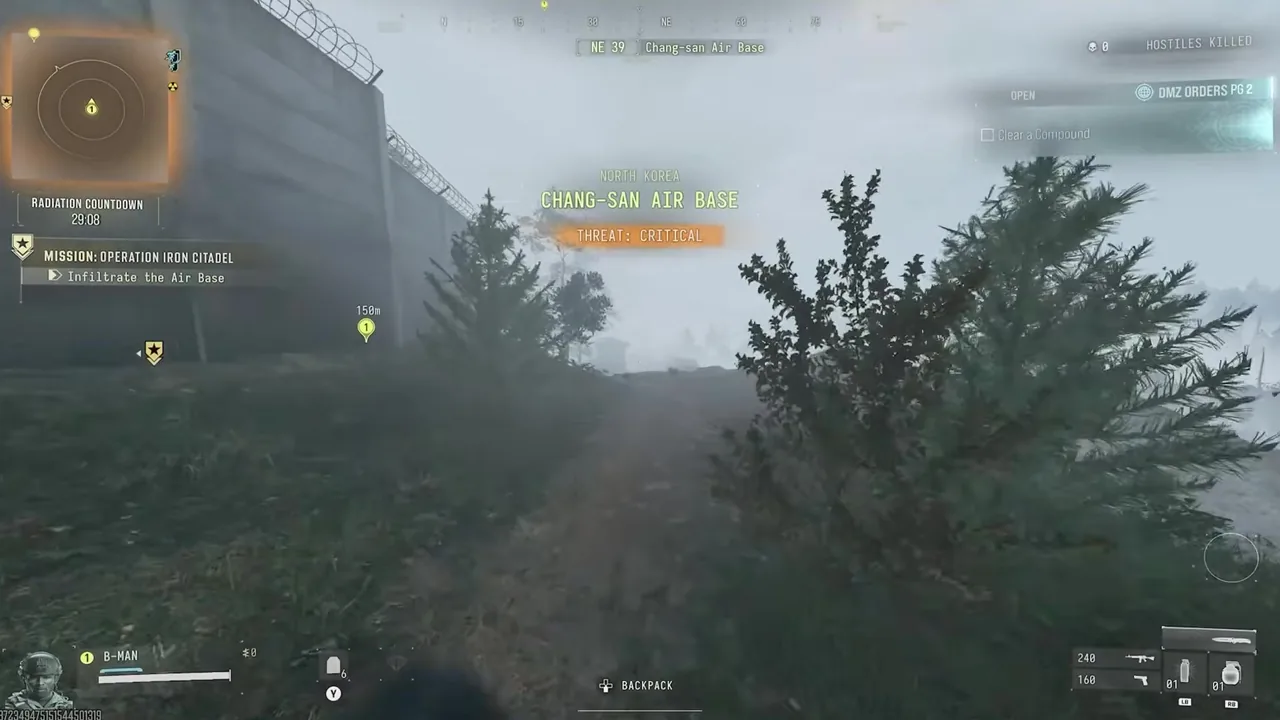
Deploy into the Operation Iron Citadel story mission, run north to the air base, slip in through the gap in the south-east wall, loot three two-storey blocks east of the main admin building, then leave east for the exfil by the river. Ignore the mission. It's only there to put you in the right place. On our map that's five points: S, the spawn; E, the wall gap; 1, 2 and 3, the loot blocks; and X, the exfil. On the in-game map grid, you drop in B6, loot in B5 and exfil in C6.
Step 1: deploy into Operation Iron Citadel with a free loadout
Pick a free loadout. You're not fighting, so there's nothing worth risking. From the deploy screen, choose Story Mission and deploy into Operation Iron Citadel. In B-Man's run the banner reads "OPERATION IRON CITADEL, STORY MISSION" and the first objective is "Approach the Air Base". You land in the woods south of Chang-san Air Base and west of Deadtown. The compass says North Korean Wilderness and the Radiation Countdown starts at 29:54. Swap to your knife: you move faster with it out, and the route is about running, not shooting.
Step 2: run north and come in through the south-east wall
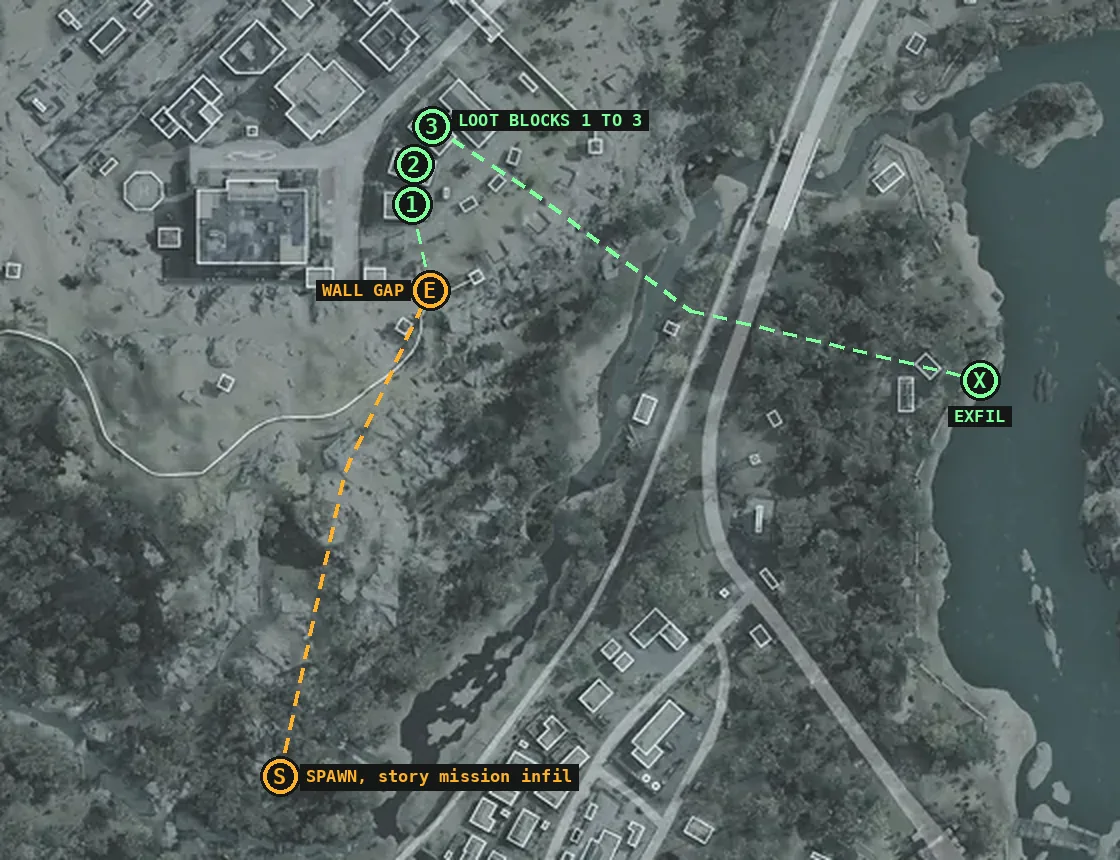
Head north up the hill towards the base. When you reach the perimeter, keep the concrete wall on your left and follow it north-east. The screen flashes "CHANG-SAN AIR BASE, THREAT: CRITICAL" and the objective changes to "Infiltrate the Air Base". Keep going to the gap in the south-east corner: that's pin E. Two soldiers patrol near the gap. B-Man's advice: either wait in the bush until they walk down and turn back, or go straight in while their backs are turned. Stealth buys you looting time. Once you're spotted, B-Man's rule is simple: stop looting and leave for the exfil.
Step 3: building 1, the block with the access card
The first block is the small square building straight ahead of the gap, east of Admin Complex No. 2 (the big square with the stronghold icon). It's pin 1 on our map, and it's also where the mission's access card turned up: "SCAN RESULT: KEYCARD FOUND". You don't need to pick it up. Work every container: duffel bags, footlockers, lockers and the medicine cabinets in the tiled washrooms. In this block a duffel gave B-Man a Throwing Knife, Rigid Synthetics (a 3D Printer ingredient, $200, used for the Medium Backpack, the Disposable Parachute and the Large Secure Backpack) and a Screamer Mine Recipe, about two minutes after he dropped. Container contents are random; the containers aren't. Don't expect his exact haul, expect the same furniture in the same rooms.
Step 4: out the window, across, and into buildings 2 and 3
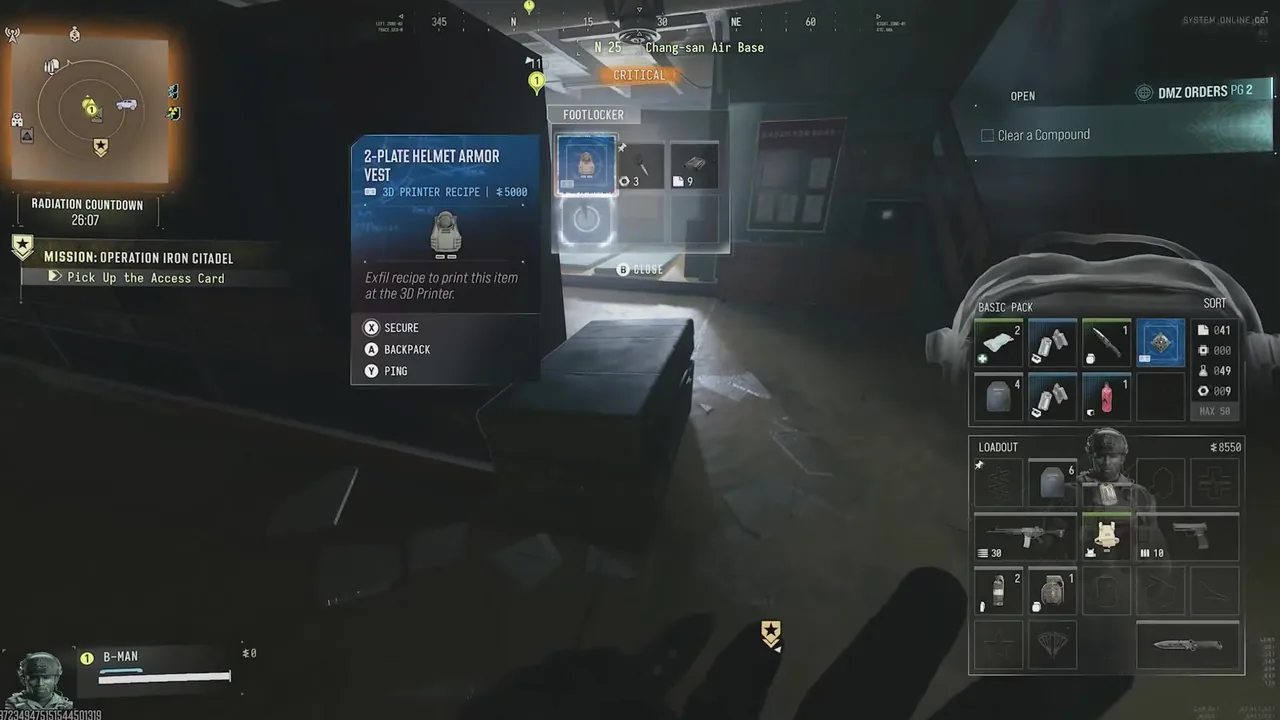
Blocks 2 and 3 sit just north of block 1, a few metres apart. B-Man's move is to go out of a window, cross the gap and climb in the next one, so you're in the open for seconds rather than walking round to a door. This is where the second recipe dropped: a 2-Plate Helmet Armor Vest recipe from a footlocker, at 26:07 on the countdown. The medicine cabinets gave Scissors, Aged Wine and Liquor, all resources. Watch for "CHEMICALS FULL" on the card when your material cap is reached; past that point, chemical pickups are wasted space. Partway through, the game warned "There's an enemy drone at your location. Don't get compromised."
Step 5: leave east for the exfil by the river
Once the third block is done, head east out of the base, cross the road and make for the exfil on the riverbank, pin X. The soldiers outside will probably shoot at you. B-Man's advice is to keep running: in his run they barely scratched him. He reached the exfil side of the map with the countdown at 23:17, about six and a half minutes after he dropped. Then he got distracted talking to camera and his recording ends on "FAILED TO EXFIL, MISSING IN ACTION". The recipes only count if you get out. Stay switched on at the exfil, keep your best item in a Secure Slot, and expect other teams to watch the same smoke.
Blueprints, recipes and manuals: what the cards actually say
B-Man calls the haul blueprints and weapon manuals. On screen, both prizes from this run are 3D Printer Recipes: "SCREAMER MINE RECIPE, 3D PRINTER RECIPE, $5,000" and "2-PLATE HELMET ARMOR VEST, 3D PRINTER RECIPE, $5,000", each with the line "Exfil recipe to print this item at the 3D Printer." So the reward is a new printable item at your FOB, and only if you extract. The Kastov 762 weapon manual card ($5,000) in B-Man's thumbnail isn't from this recording: no manual dropped in the run on camera. B-Man says he has had manuals and blueprints from these medicine cabinets on other runs, and that the Large Secure Backpack blueprint came from this route. We're reporting that as his claim. Neither recipe is in the 14-recipe table on our 3D printer recipes page yet, which comes from the community list. That's one more reason to run this route.
Pin it on the Hajin map
Open our Hajin map and pick Chang-san Air Base. Switch the base map to Official to see the building outlines: the three blocks are the small buildings on the east side of the base, between Admin Complex No. 2 and the eastern wall. The exfil sits on the river east of the base, across the main road. Our pins come from B-Man's own map pings and his player marker, laid onto Activision's map frame. They're accurate to the building. The dashed lines are the direction of travel, not a surveyed path.
Hajin map: 13 POIs → Chang-san Air Base on the Hajin map → Loot routes: every route on one map →
What we're unsure of
Whether Operation Iron Citadel always spawns you at the same spot. It did in B-Man's run, and that's the whole trick. A community source also lists this mission as the unlock for the LTV infil; we haven't confirmed it. Which story missions you need to have done before Operation Iron Citadel appears. The video doesn't say. How often the recipes drop. We saw one run with two recipes. B-Man says blueprints are "pretty much guaranteed", which is his experience, not a drop rate. How long this lasts. Routes like this tend to get noticed, by players and by the developers.
Why this matters for Wing Mait
This route is a chain of on-screen text: "CHANG-SAN AIR BASE, THREAT: CRITICAL", "SCANNING FOR ACCESS CARD", "CHEMICALS FULL", the drone warning, the countdown and the recipe cards. That's what Wing Mait reads to call out what a squadmate would shout, so your eyes stay on the patrol rather than the HUD. DMZ support is in development. Wing Mait doesn't read game memory, inject anything or send inputs to the game.
Source briefing
Route and method: B-Man, "Easy weapon manuals and blueprints: best MW4 DMZ loot spot, route, method" (YouTube, 21 October 2026). Map pins, timings, item names and card text are our own reading of his footage, frame by frame. Advice marked as B-Man's is his commentary.
SOURCE BRIEFING
Source video from B ManEASY WEAPON MANUALS AND BLUEPRINTS, BEST MW4 DMZ LOOT SPOT / ROUTE / METHOD
Watch on YouTubePlaying loads YouTube. Choose captions in the player settings. Credit and thanks to the creator.
Related field notes
 MW4 DMZ21 Oct 20263D printer recipes: all 14Every MW4 DMZ 3D printer recipe so far: inputs with quantities, max printable and unlock level, grouped by category and searchable.FIELD NOTE 35
 MW4 DMZ20 Oct 2026First look: HUD, loot and threatFrame by frame through the first full MW4 DMZ match: compass location names, threat level, loot rarity cards, secure slots, material caps, revives and vehicles.FIELD NOTE 36
 MW4 DMZ20 Oct 2026Level unlocks 1 to 70Every MW4 DMZ progression unlock from level 1 to 70: 3D Printer recipes, FOB station upgrades, stash slots, bounty payout boosts, operator skins and kits.
Sources
Numbers and mechanics on this page are paraphrased from:
Wing Mait is an independent project, not affiliated with or endorsed by Activision. Wing Mait for MW4 DMZ is in development and has not been released.